The Winter Mountain Leader Award qualifies you to take groups walking in mountainous areas in the UK in full winter conditions. It does not cover winter climbing. It covers technical navigation, snow-holing and avalanche awareness. It is an involved course at a very high standard.


3. Relocation strategies
Reliable navigation bust be backed up with well practiced relocation strategies.
Slope aspect: being able to measure the aspect of a given slope can begin a process of elimination as to where one must be on a given hillside. Explained here.
Story line: how did we come to get here? description of the journey.
Spiral search to find a exact point such as a summit cairn.
Assessing Snow Stability whilst Journeying.
Being able to distinguish different snow formations and layers within the snow pack is a quick way of gaining knowledge of obvious inconsistences that could potentially lead to sliding.
Trench test.
10 Steps heal to toe, 2 big steps uphill. Walking back to start point at a diagonal angle watching for shooting cracks, slabs breaking off ect.

Snow pits
Internationally it could be said that the emphasis has shifted from looking small scale at scientific observations to a more holistic and self aware observations of snow stability. However snow pits are still a useful educational tool that give us a snapshot of stability at a particular location and it's aspect, angle, altitude.
First of all the edge of a compass, ice axe pick or crystal card is run down the profile feeling for any inconsistencies. Then a systematic firmness test,
Fist
4 fingers
1 finger
Pen
knife
If there is a jump in the firmness ranking of more than 1, this would suggest a potential week layer with in the snow pack.
Understanding Temperature Gradient

In Scotland we do not have permafrost, ground level remains at zero degrees Celsius where as the air temperature can be much colder. Large temperature gradients with in the snow pack can draw moisture from the warmer ground level layers towards the colder surface, causing week faceted crystals, that can become a persistent week layer.
Very large Surface Hoar, Jostedallen Norway
SECTION 4 – SNOWCRAFT
Winter Mountain Leader should be able to impart the technical skills required to complete an appropriate mountain journey involving a 20° hard snow slopes.
Deciding if a given slope is appropriate for the group has many variables such as the group, the weather, time of day ect. perhaps the most important to be in tune with, is the congaing conditions underfoot: For example a hard neve slope is much more likely to cause novices with poor technique difficulty than a soft slope.


Liathach traverse in full Scottish winter conditions.
Links:
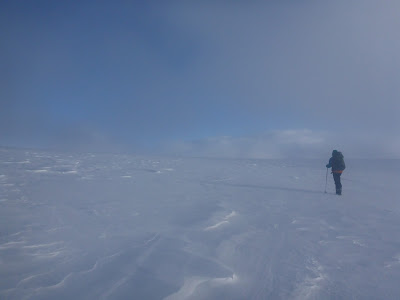
The weather conditions in the Scottish mountains is notoriously changeable and quite often volatile. Although Scotland's mountain summits are comparatively small, the highest being Ben Nevis 1345m, Its is regular to experience wind speeds in in access of 40mph, difficult to manage freezing thaw temperatures, and very poor visibility. I'm always surprised by the number of climbers I meet from the greater ranges who come here to experience incredibly changeable conditions in a relatively accessible environment that you perhaps couldn't do else where. Today the summit of Cairngorm is experiences wind speeds in excess of 100mph!
see today's data
With rapidly changing weather, comes rapidly changing conditions underfoot and a highly dynamic mountain environment. There for the planning stage of any winter day is an involved and paramount process.
Planning of your day-
With rapidly changing weather, comes rapidly changing conditions underfoot and a highly dynamic mountain environment. There for the planning stage of any winter day is an involved and paramount process.
Planning of your day-
Interoperating Weather and Avalanche forecast
The Scottish Avalanche Information Service provide daily forecasts of predicted avalanche hazard constructed by looking at observations on the ground compiled together with weather forecasts. How to interoperate these reports.
Avalanche Hazard forecast for the 14th of Febuary 2018 in the northern cairngorms
What the hazard level categories actually mean.....
European forecasts and observations.
The mountain weather information service gives a detailed mountaineers perspective on the relevant factors of the avalanche forecast. considerations such as wind speed, precipitation, freezing level and visibility are displayed in priority of importance.
Designing a plan for the day:
deciding on a suitable objective for the day is constructed by several considerations such as group aspirations/ experience, weather, journeying conditions, equipment etc. It is especially important in winter to maintain on open mind and come up with a few options for the day. Deciding on a few key places for observing conditions and acting accordingly is important before you set out. Avoid using emotive language such as, "Plan A, B and C" so as not to hieract In this way we can guard against heuristic traps in our decision making.
EQUIPMENT
maps
compasses
GPS/phone
step counters
watch
Insulation
Goggles
Gloves
Walking poles
Crampons
Axe waterproofs
Water and food
head torch
Precipitation, windblown snow, snow covered terrain, flat light and short days all dictate that navigating in winter is a much ore challenging than in summer conditions. Navigation is heavily tested component of the exam.
The skill of navigating around the mountains in winter conditions in limited visibility can be broken down into three components;
1. Reading the contours -feeling the ground under your feet.
Being in tune with the ground under your feet is paramount for being able relate the ground to the contours on the map.
 |
| very subtle rising ground to the left of the walker. |
2. Measuring Distance traveled: Pacing 150 heal to toe, 75 length of boot in-between, and Timing accurately gives us a means of measuring how far we have traveled along a vector. To do this well we need to accurately and confidently walk on a bearing.
How to design navigation legs:
The D's:
- Direction
- Distance
- Duration
- Description of the leg, destination, what is the destination, col/ summit, change of aspect ect.
- Danger, Cornices, unstable snow e.c.t think the three As: aspect, angle , altitude.
 |
| Designing a leg in bad conditions. |
3. Relocation strategies
Reliable navigation bust be backed up with well practiced relocation strategies.
Slope aspect: being able to measure the aspect of a given slope can begin a process of elimination as to where one must be on a given hillside. Explained here.
Story line: how did we come to get here? description of the journey.
Spiral search to find a exact point such as a summit cairn.
Assessing Snow Stability whilst Journeying.
Being able to distinguish different snow formations and layers within the snow pack is a quick way of gaining knowledge of obvious inconsistences that could potentially lead to sliding.
Trench test.
10 Steps heal to toe, 2 big steps uphill. Walking back to start point at a diagonal angle watching for shooting cracks, slabs breaking off ect.

Snow pits
Internationally it could be said that the emphasis has shifted from looking small scale at scientific observations to a more holistic and self aware observations of snow stability. However snow pits are still a useful educational tool that give us a snapshot of stability at a particular location and it's aspect, angle, altitude.

First of all the edge of a compass, ice axe pick or crystal card is run down the profile feeling for any inconsistencies. Then a systematic firmness test,
Fist
4 fingers
1 finger
Pen
knife
If there is a jump in the firmness ranking of more than 1, this would suggest a potential week layer with in the snow pack.
Understanding Temperature Gradient

In Scotland we do not have permafrost, ground level remains at zero degrees Celsius where as the air temperature can be much colder. Large temperature gradients with in the snow pack can draw moisture from the warmer ground level layers towards the colder surface, causing week faceted crystals, that can become a persistent week layer.

Very large Surface Hoar, Jostedallen Norway
SECTION 4 – SNOWCRAFT
Winter Mountain Leader should be able to impart the technical skills required to complete an appropriate mountain journey involving a 20° hard snow slopes.
The following skills are ranked in a progression.
- Managing our own theroregulation by appropriate layering and pase setting.
- BOOTWORK
Traversing or ascending gentle slopes buy by kicking steps across the slope. Using the edges of our stiff winter boots, rolling our knees towards the slope, swinging from the knee to cut steps into the slope a bit like a saw.
Acending by kicking the toe of our boot into the snow, toes pointed slightly down, heels just higher that perpendicular to the slope. making sure that at least half our our boot goes into the snow.
Descending buyhell plunging, toes pointed slightly up towards the skye. In a slight crouching position Really weighting each foot into the snow. OR this can leave us feeling quite exposed to the fall line , so we can turn into the slope and reverse the kicking steps in ascent procedure.
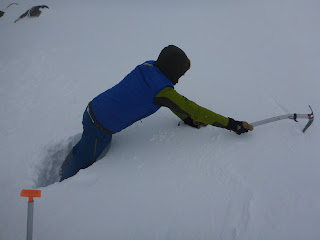
4. self belay to prevent a slip becoming a slide.
as you fall drive the spike of the axe into the snow, slide your free hand down the shaft mentioning good pressure with the up hill hand.
.
.
5. Cutting Steps
Contex of using this skill would be when crossing a short firm section where putting on and taking of crampons would be inefficient. be mindfull of precautions here, conciser using a leash. Swinging the axe striking the snow with the adze like a pendulum. slash, slash , kick,
6. Using Crampons
Context of when to put them on = before they are needed in a safe relatively flat location or cut ledge.
- keep standing up, lay crampons into the slopes so we are stepping into them.
- keep good pressure in the toe and apply teh fitting system (basket or lever)
- Check, sole unit is sitting flush on to the crampon and minimum snag hazards.
walking in crampons with our feet a little further apart than normal.
Traversing or gentle acent or decent, flat footing is the most effective- using all 10 or 12 spikes at once by rolling our knee away from the slope. Pointing toes down the fall line to make ourselfs more comfortable.
Decending by allowing all point to contact the snow at the same time. toes pointed slightly down the slope.
Ascent by front pointing, heels perpendicular to the slope. mentaining a high heal as we step up.
7. Ice axe Arrest
Finish position: Adze in the fleshy part of our shoulder under the collor bone other hand covering the spike of the axe. knees wide apart and digging in feet up. gap between snow and lower abdomen and protecting our face by looking at the spike of the axe.


roll towards the head of the axe.
if we are going head first, extend our arm and progressively apply the pick until our feet over take us, remove the pick and reapply as normal.
Watch Mountain Training Scotland's video on ice axe arrest
Deciding if a given slope is appropriate for the group has many variables such as the group, the weather, time of day ect. perhaps the most important to be in tune with, is the congaing conditions underfoot: For example a hard neve slope is much more likely to cause novices with poor technique difficulty than a soft slope.
SECURITY ON STEEP TERRAIN
Winter mountain leaders are required to be able to perform emergency rope work to ascend or descend an isolated section of steep ground. Constructing and utilising Snow Anchors requires sound judgement of the integrity of the snow and the appropriateness of varies options or techniques.
The most "belt and braces" of all the options would be a bucket seat body belay backed up by a berried axe in deep firm snow.
bucket seat and berried axe belay
- asses the best location, inline with fallline, probe the snow depth ect.
- dig the bucket seat first; the front face must be perpendicular to the slope as deep as our shin bone (30cm). The space should be big enough for your to belay comfortably for both you and our bag.
- reach up as far as possible from your bucket seat and score out the T slot position.
- step up to where you want the T slot to be careful no to disturb the snow in front of the Axe slot.
- dig the T slot to at least elbow deep, sitting in the firmest layer of snow in the snow pack
- score out the line for the sling to lye, clove hitched to the axe, carefully with the pike of your axe.
- adjust the rope to the desired tension so as there is no slack in the system but you can still get well established in the bucket seat without being suspended from the anchor.
Note: to get the depth of the bucket seat right, you want a little bit of room behind your knees, but not so much that you aren't sinking in to a nice and secure stance.
video on digging a bucket seat from Glenmore lodge here.
Snow Bollard
There are three sizes of Bollard depended on the snow conditions.
1. firm snow ice ; using a template with your ice axe only( spike to head radius.
2. firm neve : using your elbow and ice axe and secondly
3. Soft snow: full extended reach. if very soft a may stamp down on the area first.
import points are to create a slight mushroom lip to help prevent the rope lifting, and to insure that we keep a downward pull on the bollard as we weight it.
If using the bollard to back up a bucket seat, the back wall needs to be at least 1.5 m below the bottom of the snow bollard, even more so if using a full size bollard to keep the angles low.
watch a video from Glenmore lodge here.
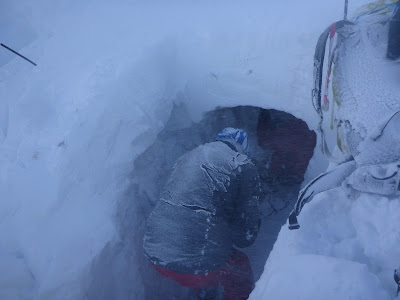
There is a requirement in the syllabus for aspiring winter mountain leaders to spend two night consecutively sleeping in Snow holes if conditions allow. Therefore becoming efficient and practiced at digging out a comfortable sleeping and cooking environment is highly beneficial.

Excavating the entrance to a snow hole somewhere in the Cairngorms. If possible choose a sight a little up a small rise so a gravity assists the removal of rubble from with in.

If done well, snow holes can be surprisingly comfortable micro climates and potentially life saving skills.
|
Wind Speed forecast
|
Effect on you
|
|
Less than 20
|
Negligible
|
|
20-30 mph
|
Unlikely to affect your balance. Severe wind chill
|
|
30-40mph
|
Starts to affect your balance. Risk for frost nip on exposed flesh
|
|
40-50mph
|
Walking will be arduous. Will need to brace lean into the wind risk
of being blown sideways.
|
|
50-60mph
|
Walking very challenging. Move between gusts and brace yourself when
gusts arrive. Stay well away from exposed ground and decentd.
|
|
70+ mph
|
Avoid going out. You may have to resort to crawling. Very dangerous
is caught out in these conditions.
|


No comments:
Post a Comment